
French Style Apple Jelly - or Gelee de Pommes
My mother loved making jam, or confiture as we called it. She would gather whatever was falling from the trees at her mother's house in the Loire Valley and pile it in the trunk of our car for our pilgrimage back to our apartment in Paris. The next afternoon, while my sisters were napping, we would break out her impossibly heavy copper saucepan and get to work.
I don't remember much about the process beyond mountains of white sugar and delicious smells wafting out in big gusts of smoke out of that witch's cauldron. What I do remember with supernatural clarity is the intensely sweet and fruity taste of the hot and liquid jam she would spoon into my mouth during the cooking. The flavor inside my mouth was intoxicating, a million times better than the sweetest candy.
I have no family home to return to, no childhood bedroom to visit. But I still feel the pull of home, particularly strong in the fall, when the leaves start crunching under my feet. The vivid colors, the crispness in the air, everything reminds of me France and calls me home. Walking the dogs in the crisp fall leaves, I close my eyes and breathe deep, flooding myself with memories of my own walks home from l'Ecole Bleue, stuffing my pockets with thorny chestnuts, and walking in to the smell of my mother apple jelly bubbling on the stove.

Although our family trips to France were not frequent enough, my children still feel a connection to my homeland. During our trips to visit my mom, we would walk in the woods, split thorny chestnuts to reveal the shiny brown skin inside, and eat as many baguettes and croissants as we could. Being with my mom at her house in the Loire Valley meant long walks with the dogs, fruit picking, and fishing for pike in the pond.
This recipe doesn’t call for pectin as there is so much naturally in the apple cores and seeds. The process requires longer cooking time, but the resulting flavor and color will be much more intense. However, this jelly is definitely more runny than what you’d buy in the supermarket, even after an hour of cooking. I often leave it to cook for longer, making it even more caramel in color. If you like your jelly more set, and want to make this a shorter cooking project, feel free to add some pectin.
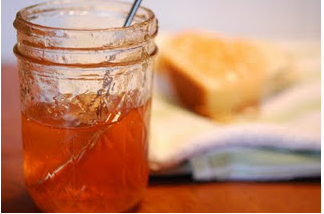
I miss my mom all the time. It’s been almost six years since she died, but I still find myself reaching for the phone to call her and catch up. The longing is most intense in the fall so I look for the comfort of childhood memories by filling my house with the smell of apple jelly, bubbling softly on the stove. Here's my recipe, a runny, homemade jelly that tastes as sweet as childhood memories.

Apple Jelly
This jelly is intensely sweet and fruity. It is a labor of love whose product we use all year long both on toast and on roast pork and chicken.
Ingredients
- 4 1/2 pounds of quartered apples - use a variety but make sure they are all sweet
- 2 lemons
- 8 cups of water
- 5 cups of sugar
Instructions
- Cut your apples into quarters.
- Throw them in a large stock pot. Squeeze the juice of the lemons on top. Cover with water and boil for an hour.
- Cover a sieve with cheesecloth. Place the sieve over a large bowl. Put the cooked apples in a sieve in two batches and squeeze gently to collect the juices. Repeat for the second batch. You should have about 7 cups of liquid. You can now discard the apples.
- Place the liquid back in the stockpot. Add the sugar and bring to a boil.
- Lower the heat and simmer for an hour or two, until the jelly is thickened and darkened.
- Meanwhile, in a separate large stockpot, boil your canning jars.
- When your jelly is ready (if it has reached 220 degrees fahrenheit or gels when a small drop is put on a chilled plate), remove the jars from the boiling water carefully with tongs. Pour the jelly in using a canning funnel, leaving a half an inch of space at the top. Screw on the lids.
- Place each jar back into the boiling water for 10 minutes to process the jars.
- Remove them again and place them inverted on the counter until completely cooled to complete the sterilization process.
- As they cool, you'll hear a delightful pop as the jar lids seal completely. They'll stay tightly sealed until you open them, hearing the same pop again. These jars will keep a year in a cool, dark place. The jelly is delicious both on toast and chicken!